Overview of the Task Screen
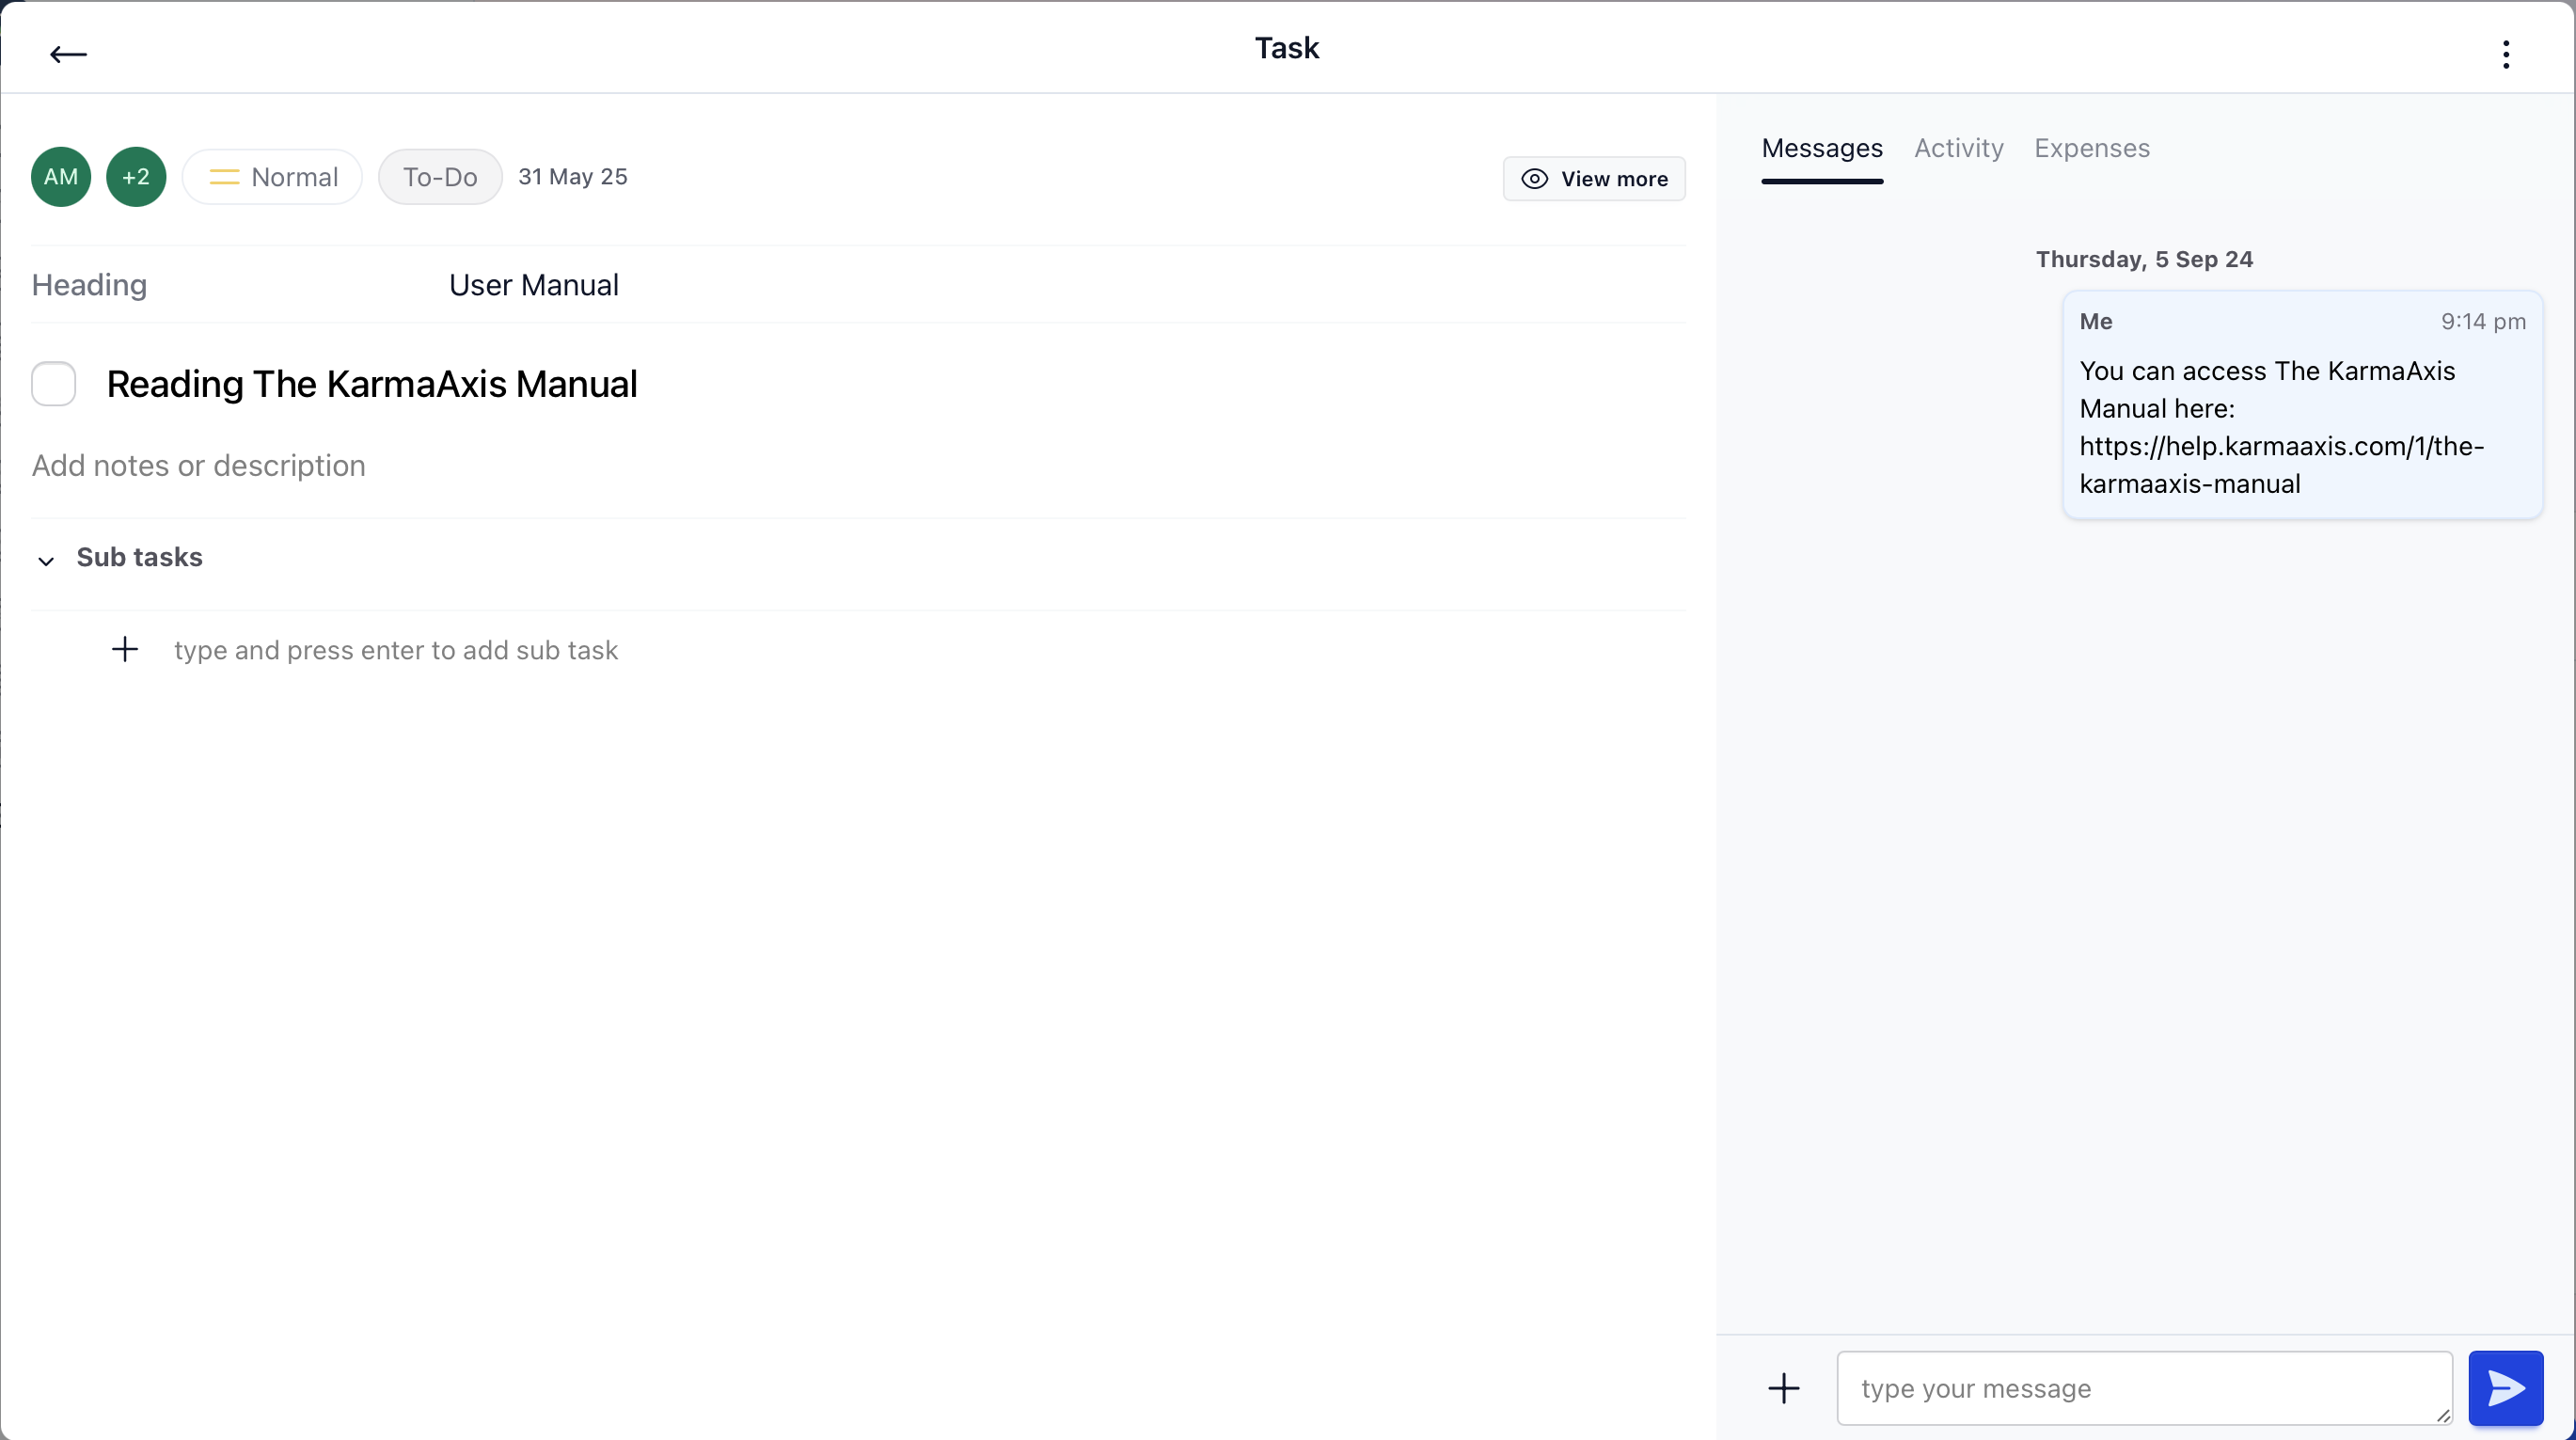
Once a task is created in KarmaAxis, clicking on it opens the Task Panel — a powerful workspace to manage every aspect of the task. This panel is designed for clarity, focus, and collaboration, combining everything you need into a single, flexible layout.
Once you've created a task, the task panel opens as a popup, divided into two main sections: Task Details (left) and Task Components (right).
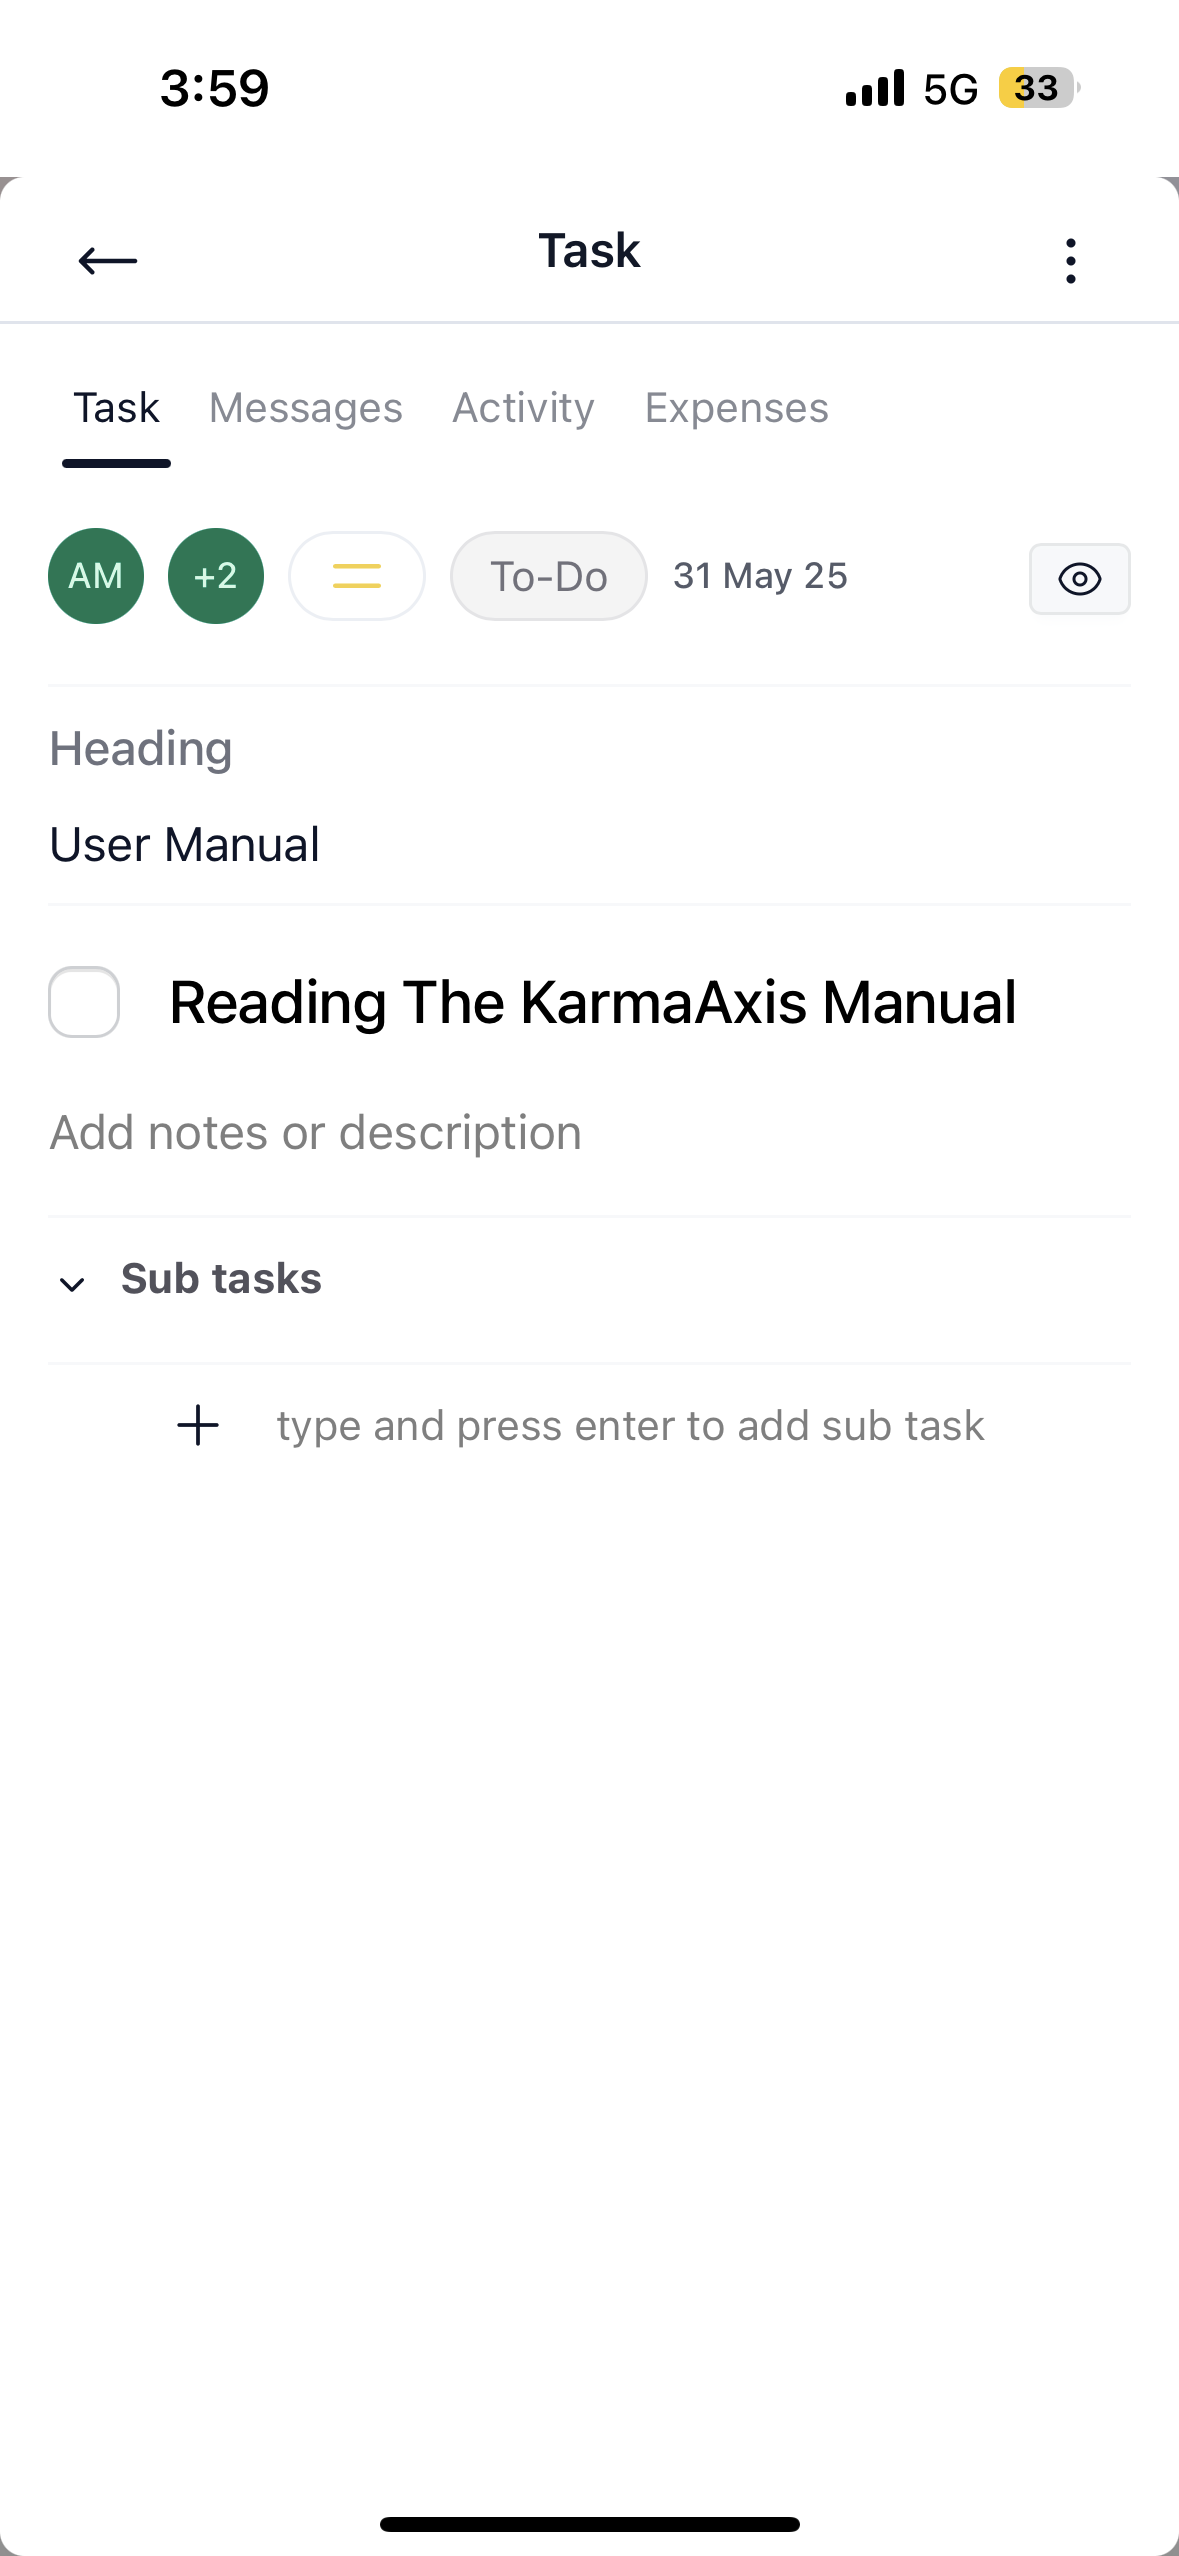
However, on mobile, the layout is rearranged for ease of use:
- Tabs like Task, Messages, Activity, and Expenses appear horizontally.
- Task details stack vertically for better scrolling.
- Long press or tap the assignee/profile icons to manage people involved.
This ensures easy navigation and viewing on smaller screens.
Left Side: Task Details
This section provides detailed information about the task, such as the task name, priority, status, and sub-tasks. Here's a breakdown of each element:
1. Assignee & Co-Actors
In the top-left corner, you can see a thumbnail of the Assignee (the person responsible for completing the task).
If there are Co-Actors (team members involved), they are indicated by a + number next to the Assignee's thumbnail. For example, "+2" means two additional people are collaborating on the task.
2. Priority Level
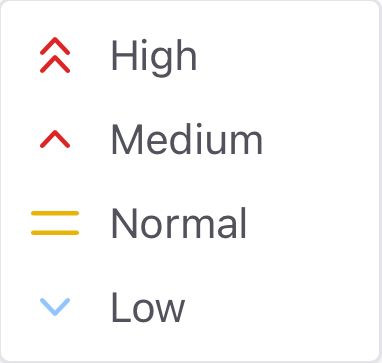
Next to the assignee's thumbnail, you’ll find the Priority of the task using colour coded arrows. Priority levels help indicate the urgency of the task:
**- High
- Medium
- Normal
- Low.**
3. Task Status
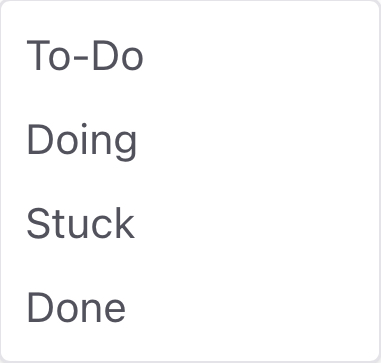
Beside the priority, the Task Status is displayed. This shows the current progress of the task, and the status can be:
**- To-Do: The task has not been started yet.
- Doing: The task is in progress.
- Stuck: The task has encountered an obstacle.
- Done: The task is complete.**
4. Task Name & Completion
Below the priority and status, you’ll see the Task Name. This is the title or description of the task.
Clicking the checkbox next to the task name will mark the task as done. Once checked, the task is considered done and moves to a “Done” status.
5. Notes
This section allows you to add any additional notes related to the task. It’s a great place to provide context or detailed instructions that the team might need.
6. Sub-Tasks
Below the notes, you’ll find the Sub-tasks section. You can create smaller steps by typing them in the field labeled “Type and press enter to add sub-task”. These subtasks help break down larger tasks into more manageable steps. Sub-tasks can be individually marked as completed.
7. View More: Advanced Task Details
By default, the task panel shows only the most essential fields to keep things clean and focused. To access additional information, click the “View more” button at the top of the task.
This will reveal optional fields such as:
Heading – Group the task under a custom list.
For Contact – Link the task to a specific client or vendor.
Karma – Connect the task to a larger project or process.
Tags – Add labels for quick filtering and search.
Click “View less” to collapse the panel back to its simplified view.
This toggle keeps your task view streamlined while allowing advanced users to manage richer data when needed.
People Section - Assigning and Collaborating on Tasks
The People section in Tasks is designed to manage and display all the individuals involved in a specific task. This tab helps you see who is responsible for the task, who created it, and who else is collaborating on it. Clear visibility of participants ensures accountability and smooth teamwork.
Here's a breakdown of what each section in the People Tab is meant for:
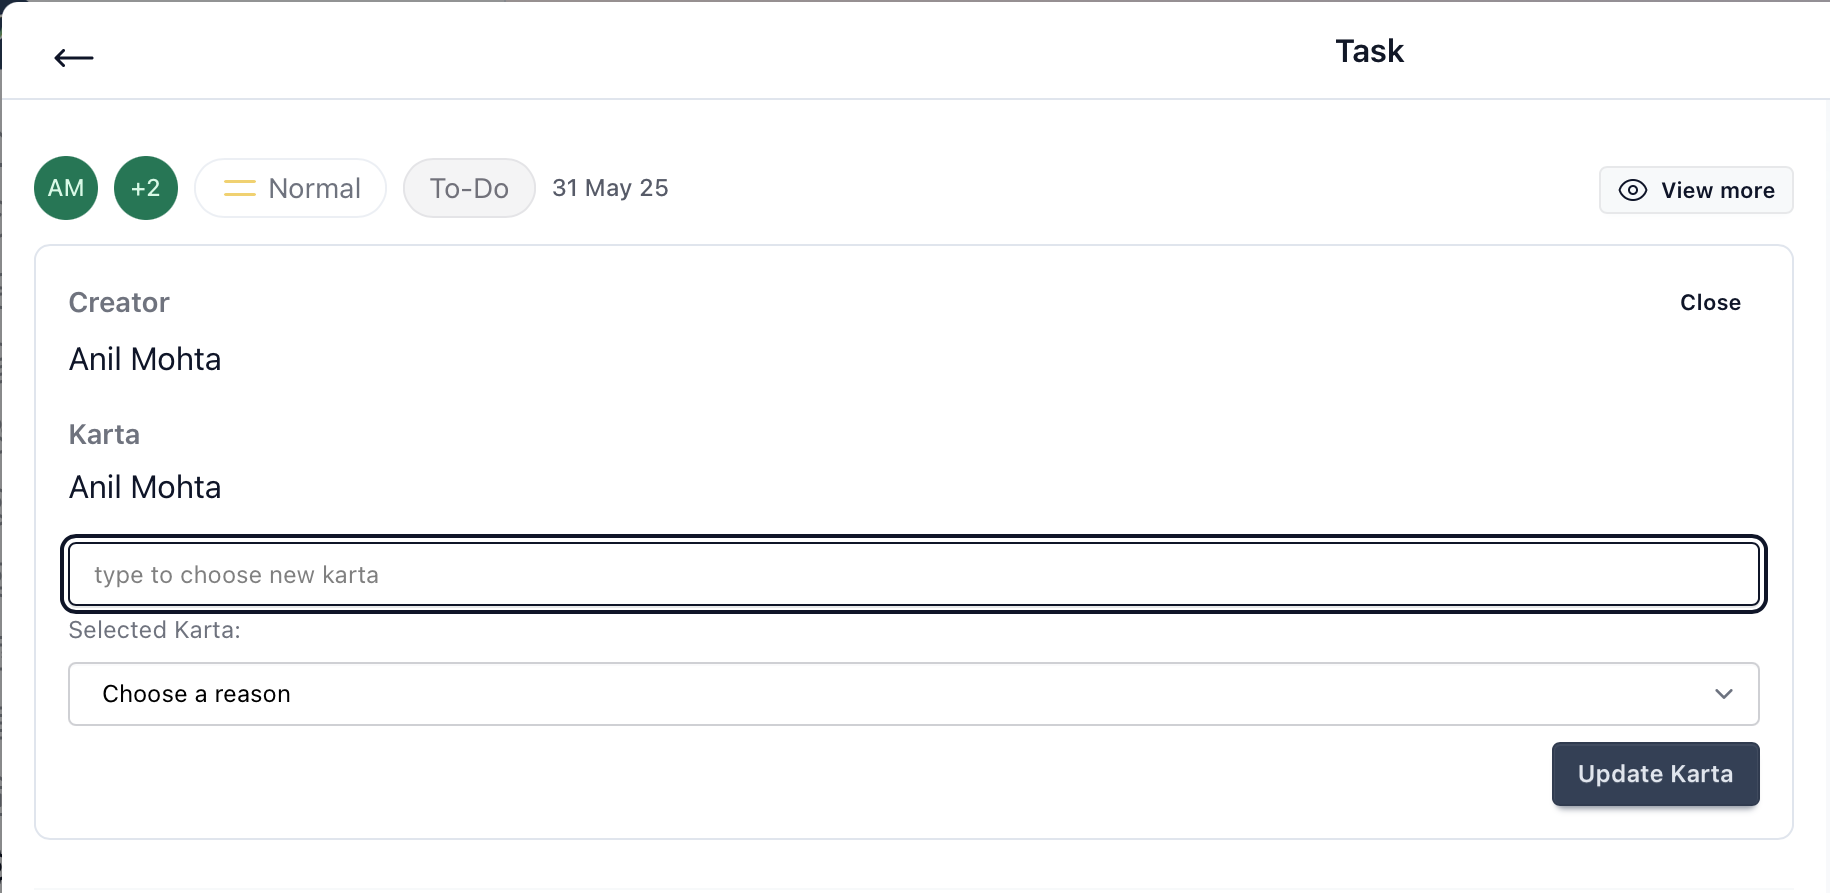
- Creator: This section shows the Creator of the task—the person who initially created the task. The creator cannot be changed. This information helps track who initiated the task.
In the image, Anil Mohta is the task creator, and the task was added on 5 Sep 24.
- Karta/Assigned to: This section shows the Karta (also known as the Assignee), who is the primary person responsible for completing the task. The Assignee’s name and profile picture are displayed here. If you need to change the assignee, you can do so from this section (depending on your permissions).
In the image, the task is assigned to Anil Mohta.
To assign or reassign the Karta:
- Click the current assignee’s name or profile picture.
- A reassignment panel will open.
- Select a new assignee from the dropdown.
- Enter a brief reason for the change (mandatory for transparency).
- Click Update Karta to confirm.
This process ensures that task ownership remains clear and changes are well-documented.
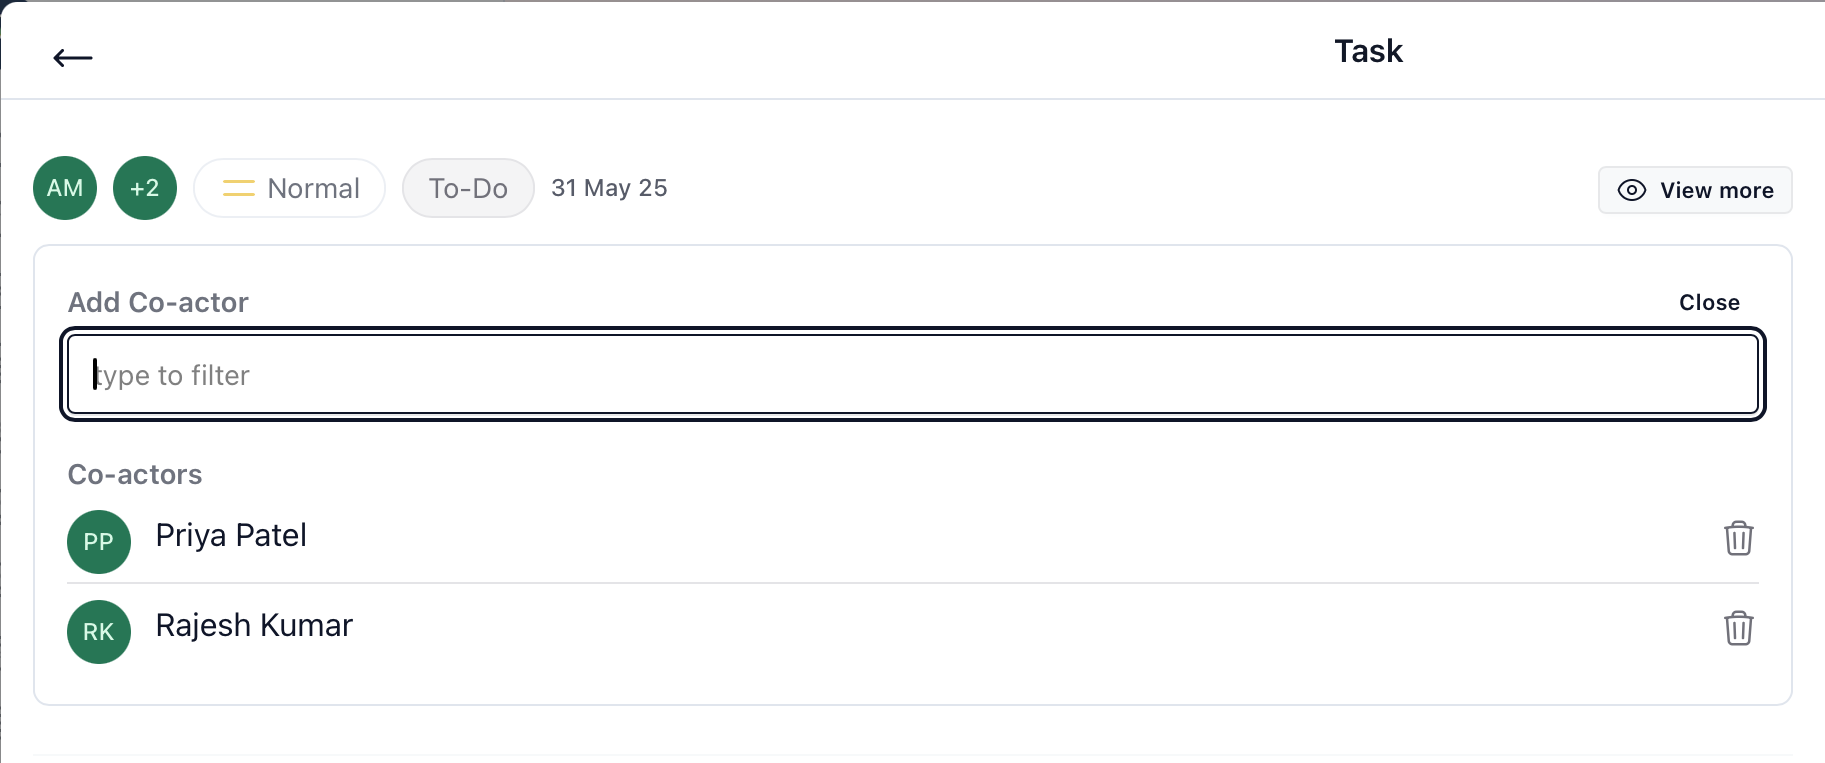
- Co-actors: Co-actors are additional collaborators on the task who support the Assignee / Karta in completing the task. Their names and profile pictures are displayed in this section. Each Co-actor can contribute to the task by adding comments, completing subtasks, or attaching files.
To add Co-actors:
- Click the Co-actor icon (e.g., "+2").
- Select one or more users from the dropdown list.
To remove a Co-actor:
- Click the trash icon next to their name.
Note: Co-actors cannot edit core task details (like due date, tags, or assignment) but are fully involved in execution.
In the image, Priya Patel and Rajesh Kumar are listed as Co-Actors.
Purpose of the People Tab:
View Participants: Quickly see who is involved in the task, including the creator, assignee, and any collaborators.
Manage Participants: Easily add or remove people from the task as needed. This helps ensure the right team members are involved at all times.
Track Responsibility: By clearly identifying the task's assignee and co-actors, you can track who is responsible for different aspects of the task and ensure accountability.
This tab is essential for understanding who is responsible for the task and who can contribute to its completion, making it easy to delegate and track work.
Messages Tab - Communicate Clearly Within the Task
The Messages Tab is your dedicated space for all task-related communication. Whether you’re coordinating updates, clarifying instructions, or sharing files, this tab keeps your entire conversation organized and accessible — right where the work is happening.
Here's a breakdown of how to use the Messages Tab effectively:
Key Features of the Messages Tab:
1. Task Discussion
- All messages posted by task collaborators appear here in a threaded format.
- Each message includes the sender's name and the time and date it was posted, making it easy to track conversations chronologically.
2. Posting a New Message
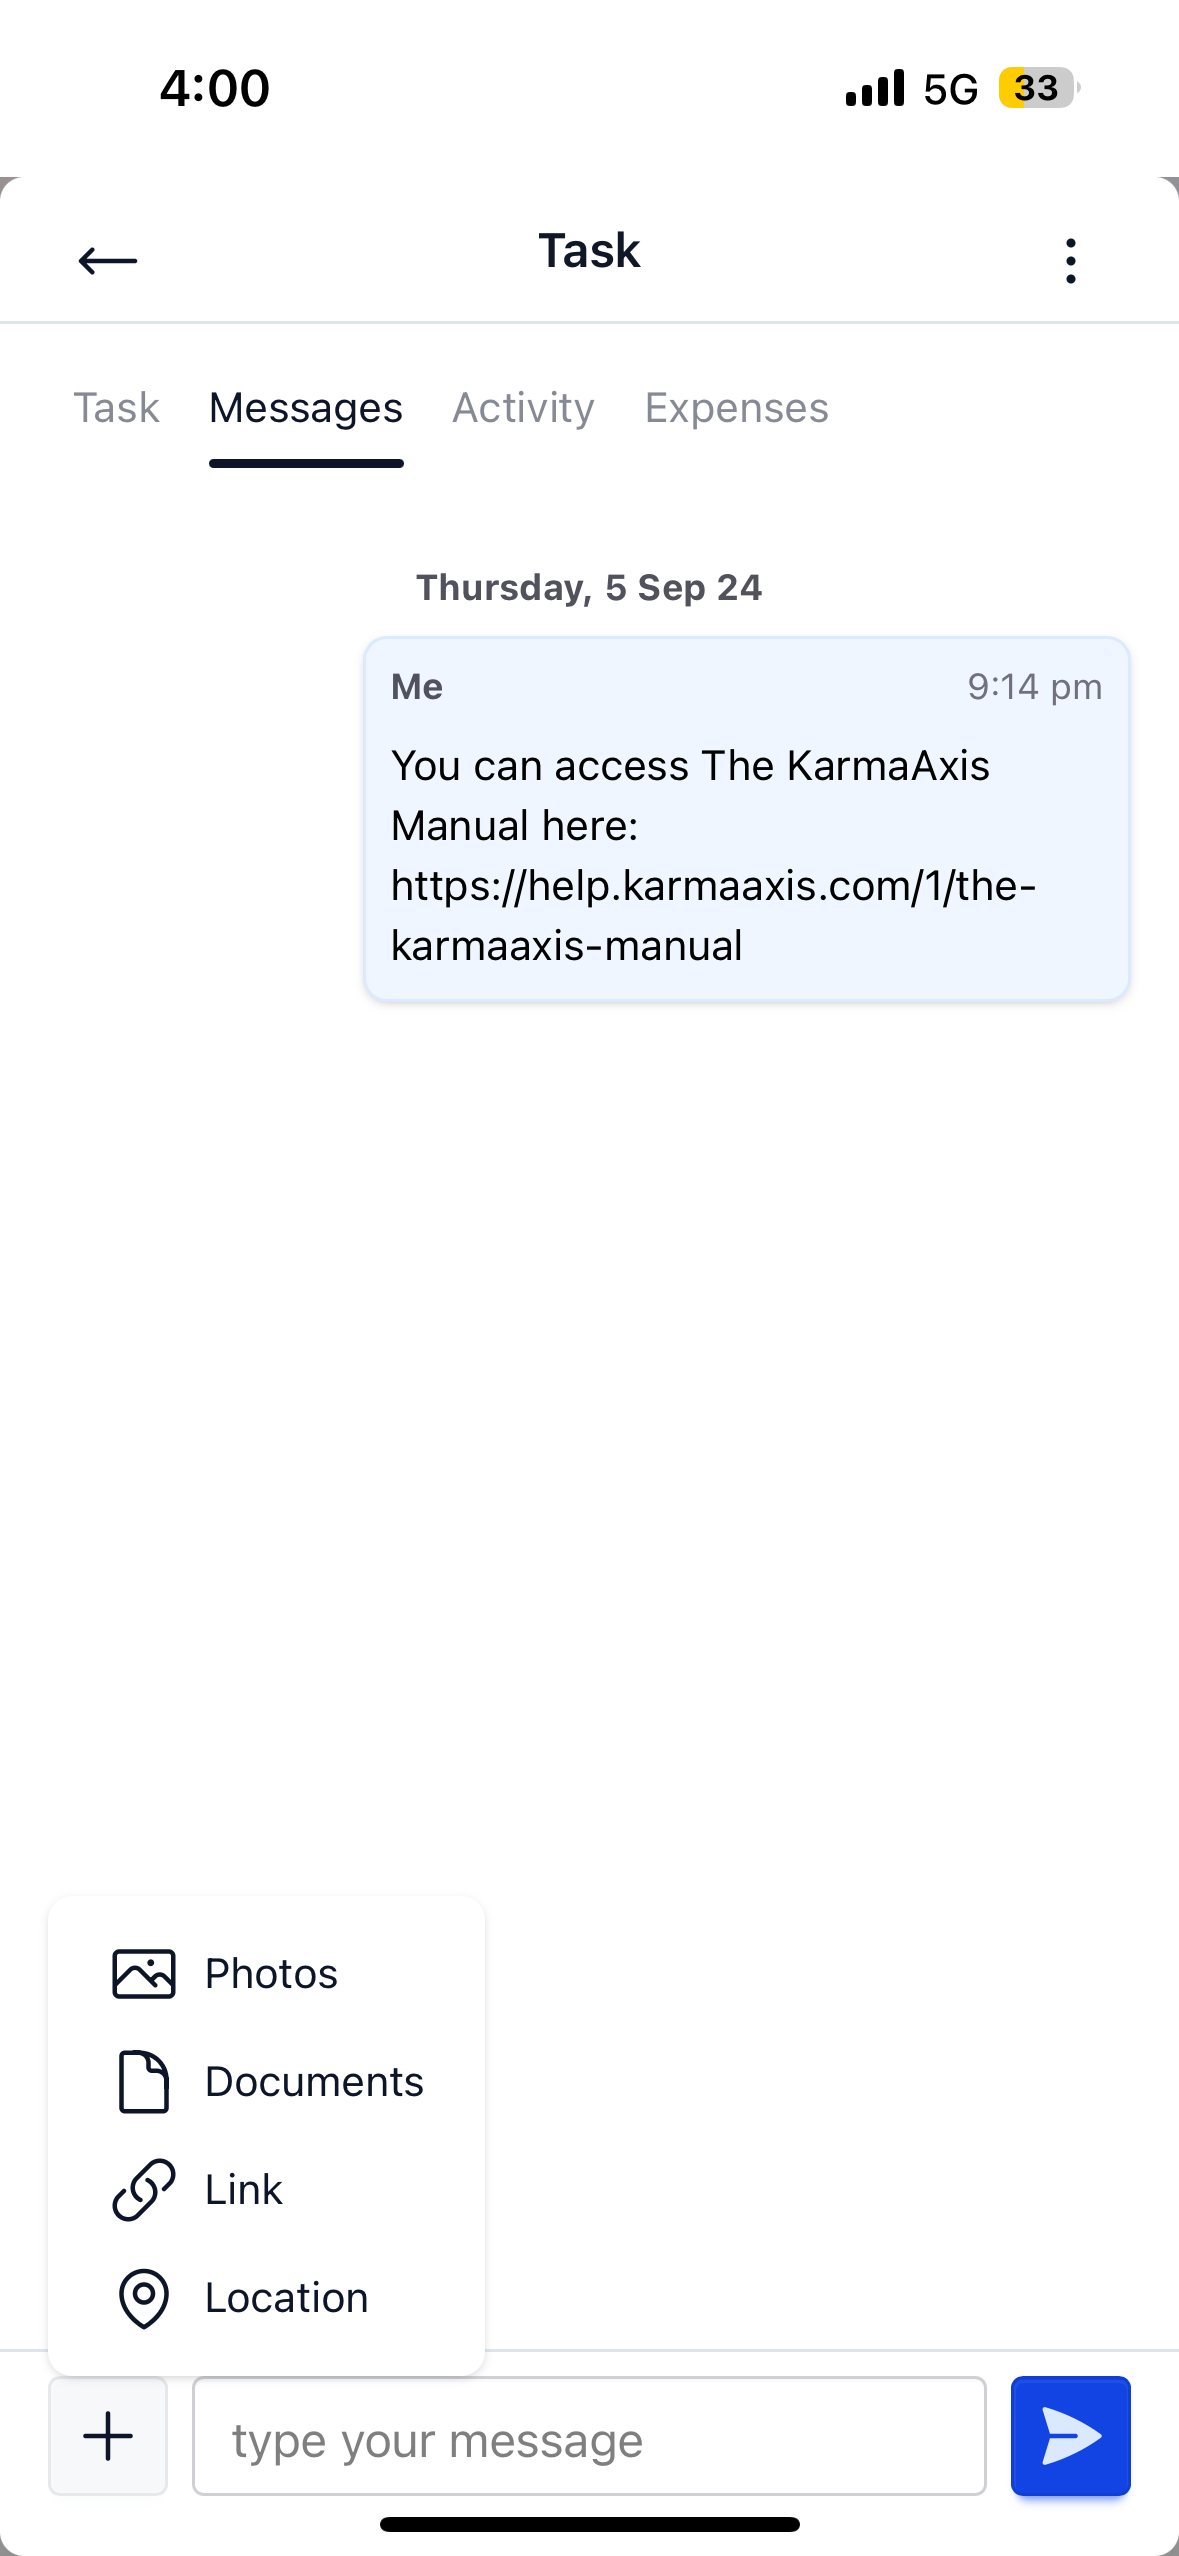
- At the bottom of the Messages Tab, you’ll see a message input box labeled "Type your message". You can use this field to post updates, ask questions, or give feedback on the task.
- Type your message in the box, and click the send icon (paper plane / arrow) to post it.
3. Adding Files, Photos & Links
Click the plus icon (+) located next to the message box to open attachment options. A small dropdown will appear, giving you four options: - Photos: Select this option to upload images related to the task. - Documents: Choose this to attach important files, reports, or reference materials. - Link: Paste a URL (e.g. Google Drive, Notion, website) Note: YouTube links auto-embed and play directly within the chat. - Location: Share your current location when relevant (useful for on-field teams)
Once added, the file or link appears directly within the conversation thread — making it easy for others to access without switching tabs or tools.
Why Use the Messages Tab:
Centralized Communication: No more scattered updates across emails, WhatsApp, or calls. Everything is right inside the task where it belongs.
Built-in Context: Discuss and share updates with the task itself, so no one loses sight of the big picture.
Effortless File Sharing: Share relevant attachments and access them anytime — no hunting through inboxes.
Real-Time Updates: Instantly inform your team and get notified when someone responds or uploads new content.
Threaded, Time-Stamped Conversations: All conversations appear in a clean, chronological flow — helping you track progress and decisions. No need to dig through emails or chats to find what someone said — it’s all here.
Using the Messages Tab ensures that communication remains organized and that all necessary files are available in a single, accessible space.
View More — Additional Fields for Deeper Task Context
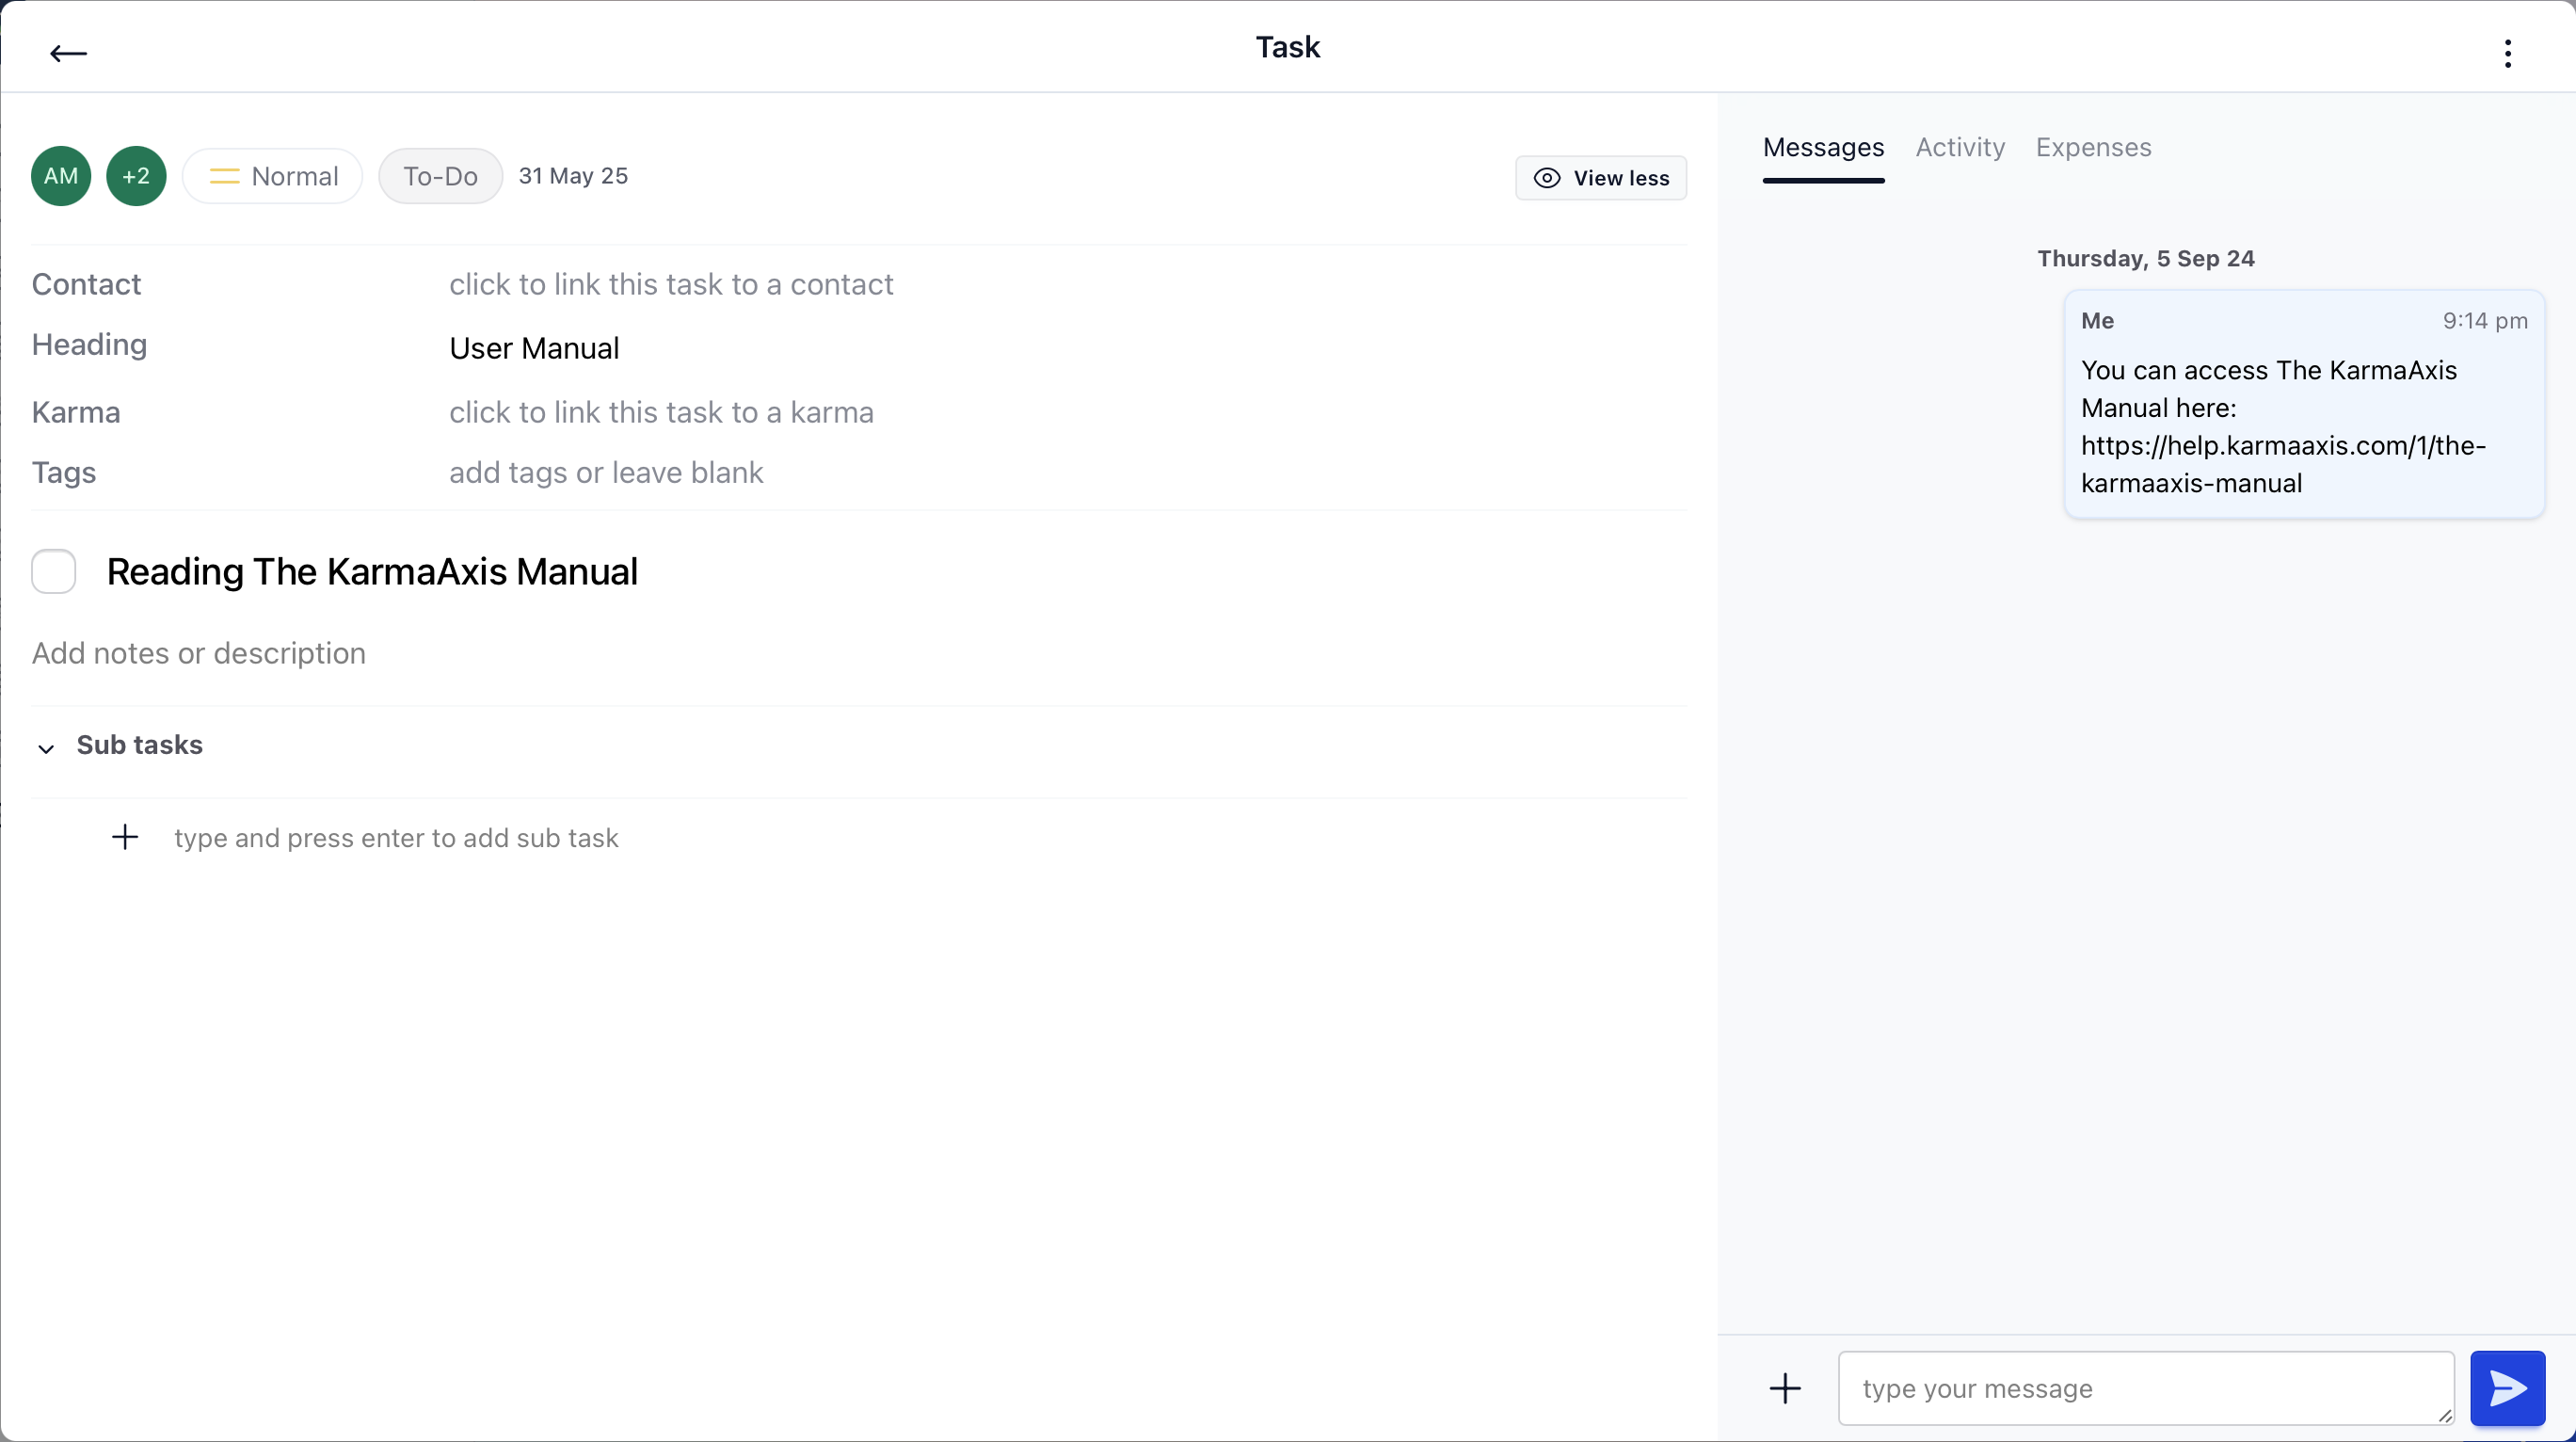
The View More panel in the task screen offers additional fields that help you add structure and context to your tasks. These fields don’t always need to be filled out, but they’re valuable for organizing tasks within larger workstreams, tagging stakeholders, and improving reporting.
To access these options, click or tap the "View More" button inside any task panel.
However, Co-Actors can only view the content in this tab and cannot make changes or access any clickable options. Here's a breakdown of the fields and their uses:
Fields in the View More Panel:
1. Heading
- This field allows you to categorize the task under a shared heading to group similar items together.
- To change or create a heading, type a new name or select from existing ones. Use headings like “Design,” “Operations,” or “Sales Follow-ups” to improve task visibility.
- Headings are used to group tasks and are visible in both list and board views, providing a structured way to segment and filter your work.
2. For Contact
- You can link a task to a contact related to this task. This could be a client, customer, vendor, or any other relevant individual. This allows for clearer responsiblity and traceability.
- To assign a contact, click the field labeled "click to assign," and choose from a list of available contacts.
- Once tagged, you’ll be able to see all tasks linked to that contact from their profile in the Contacts module.
3. Karma
- Karma refers to a larger initiative, form, or process your task is a part of.
- If this task contributes to a broader Karma (e.g., an SOP, sales cycle, or internal review), you can link it here.
- Click the field and choose from existing Karma records to establish the connection.
4. Tags
- Tags make it easier to filter, find, and report on tasks across categories.
- Add one or more descriptive labels like “Urgent,” “Finance,” or “UI Bug.”
- Click “add more” to include additional tags.
- Remove a tag anytime by clicking the “X” beside it.
5. Update Button
- After making changes to the Heading, Contact, Karma, or Tags, click the Update button to save those changes.
Key Note for Co-Actors:
- View-Only Access: Co-Actors cannot make changes to any of the fields in the Links Tab. They can view the information provided but won't have clickable options for modification.
Why Use The View More Panel?:
- Enhanced Context: Link tasks to customers, projects, or categories to provide clarity.
- Smarter Organization: Use tags and headings to streamline filters and reporting.
Cross-Module Visibility: Connecting to Contacts and Karma ensures the task shows up where it matters.
This tab is an essential tool for keeping tasks organized, linked to relevant data, and easily trackable, especially when managing multiple projects or goals.
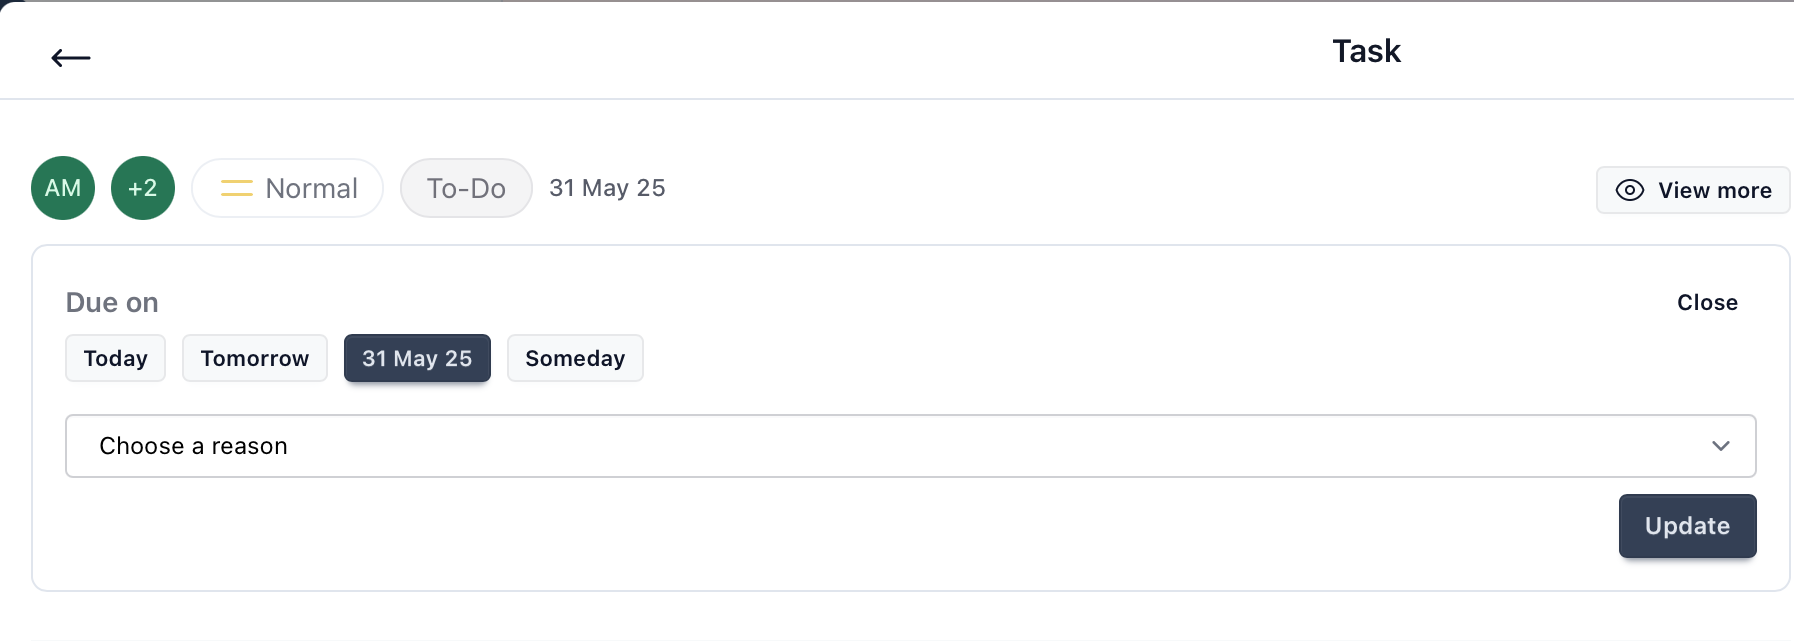
Due Date:
The Due Date section lets you schedule when a task is expected to be completed. Setting a due date helps prioritize work and ensures everyone stays aligned on deadlines.
When no date is selected, a grey calendar icon is shown as a placeholder. Once a date is assigned, it appears clearly beside the calendar icon for quick reference.
You can choose from the following options:
Today – Assigns the current date as the deadline.
Tomorrow – Sets the next calendar day as the due date.
Set Date – Opens a calendar picker so you can choose any specific future date.
Someday – Use this for tasks that don’t have a strict deadline yet but should remain visible for future planning.
Setting appropriate due dates is essential for task prioritization, reminders, and reporting across KarmaAxis.
Editing the Due Date
- To change the due date, click the current due date or calendor icon.
- When modifying the due date, you will be required to provide a reason for the change. This helps ensure transparency and accountability for any date adjustments.
Future Features:
In upcoming updates, users will be able to manually enter the start and end times for tasks. This feature will allow you to track how much time each stakeholder (such as the Assignee or Co-Actors) is spending on the task. This can be especially useful for managing task efficiency and workload distribution.
Key Points:
- View-Only for Co-Actors: Co-Actors cannot change the due date or time-related details, but they can view the information.
- Reason for Changes: Any modifications to the due date will require a reason, which is important for task management and communication.
- Future Time Tracking: The ability to track actual time spent on tasks will be added in future updates, enhancing task management and accountability.
This tab is crucial for keeping tasks on schedule and tracking progress, ensuring that all stakeholders are aware of important deadlines and how time is managed across the team.
User Guide: Expenses Tab in Tasks
The Expenses Tab in KarmaAxis is designed to track any expenses related to the task. This feature allows you to log, categorize, and manage costs efficiently. Here’s a breakdown of how to use the Expenses Tab, and the steps involved in adding an expense.
How to Use the Expenses Tab:
1. Add Expense
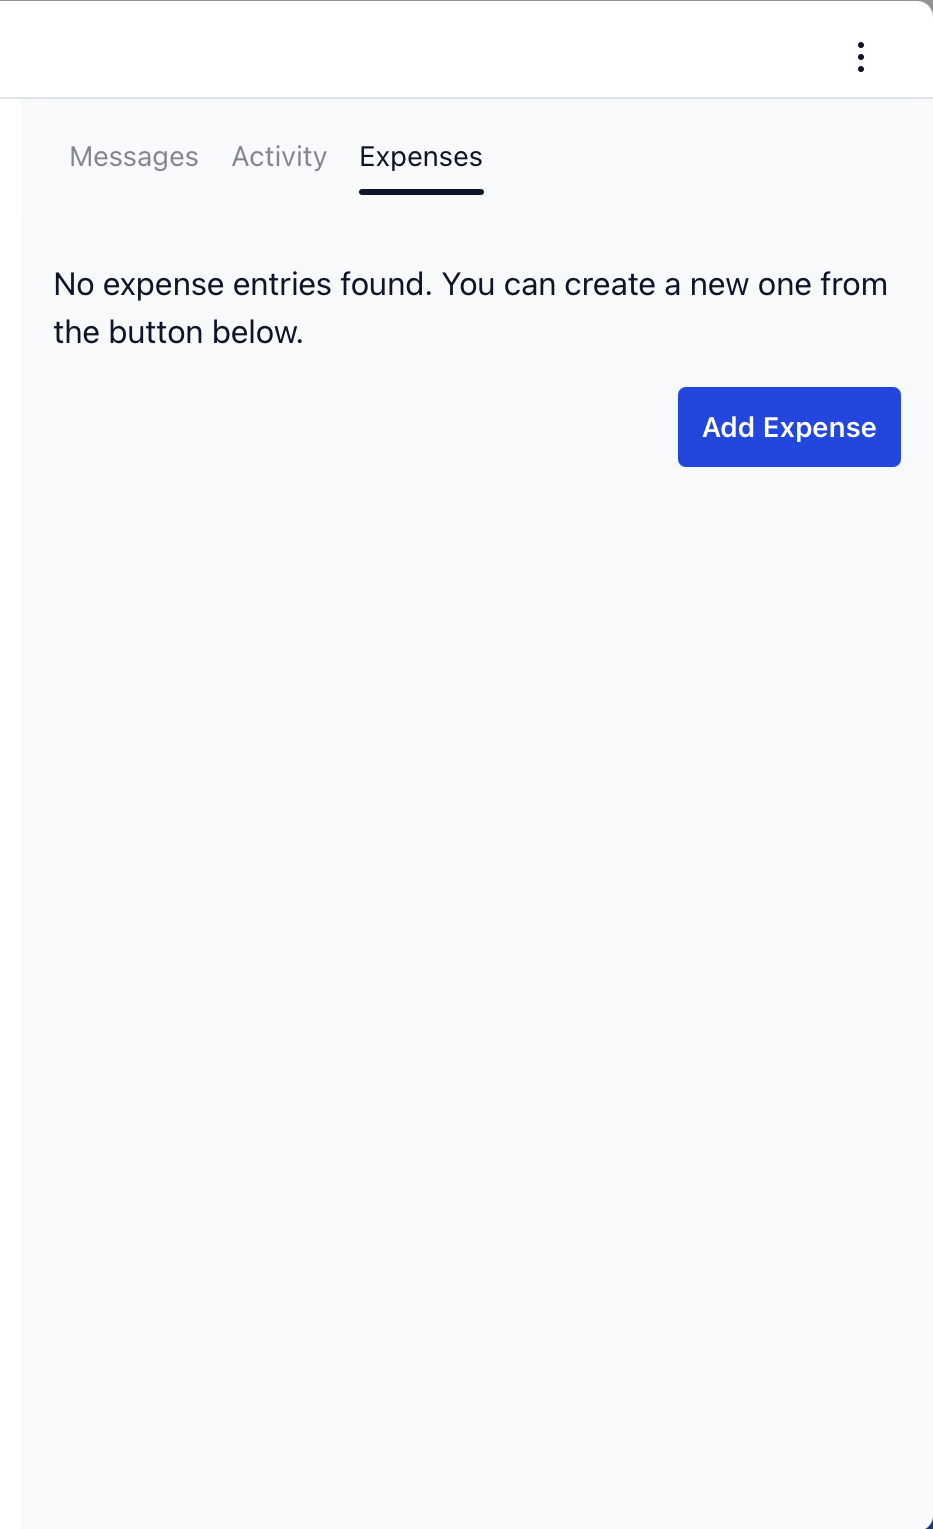
- When no expenses have been added, you’ll see a message that says "No expense entries found."
- To add a new expense, click the Add Expense button. This opens a popup window where you can input the expense details.
Adding an Expense:
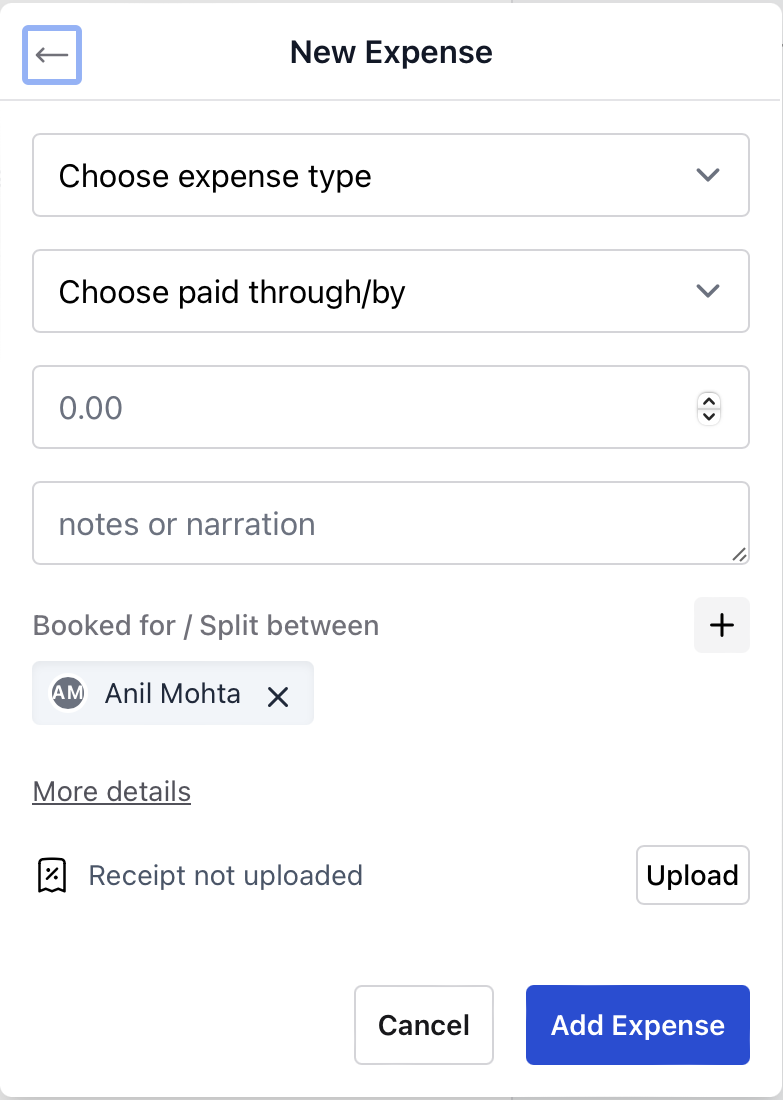
Once you tap Add Expense, a popup will appear with various fields to be filled out. Below is a guide to each field:
2. Expense Type
- Choose the Expense Type from a dropdown menu. The expense types are predefined by the admin and could include categories such as travel, office supplies, client meetings, etc.
3. Paid Through/By
- The Paid Through field specifies how the expense was paid. By default, this field includes three options:
- Bank: Paid directly through a bank transfer.
- Petty Cash: Paid using small cash available for immediate needs.
- Personal: Paid by the employee using personal funds.
4. Amount
- Enter the amount spent on the expense in this field.
5. Notes or Narration
- Add any relevant notes to describe the expense. This could include the purpose of the expense, who it was for, or any additional context.
Advanced Expense Details:
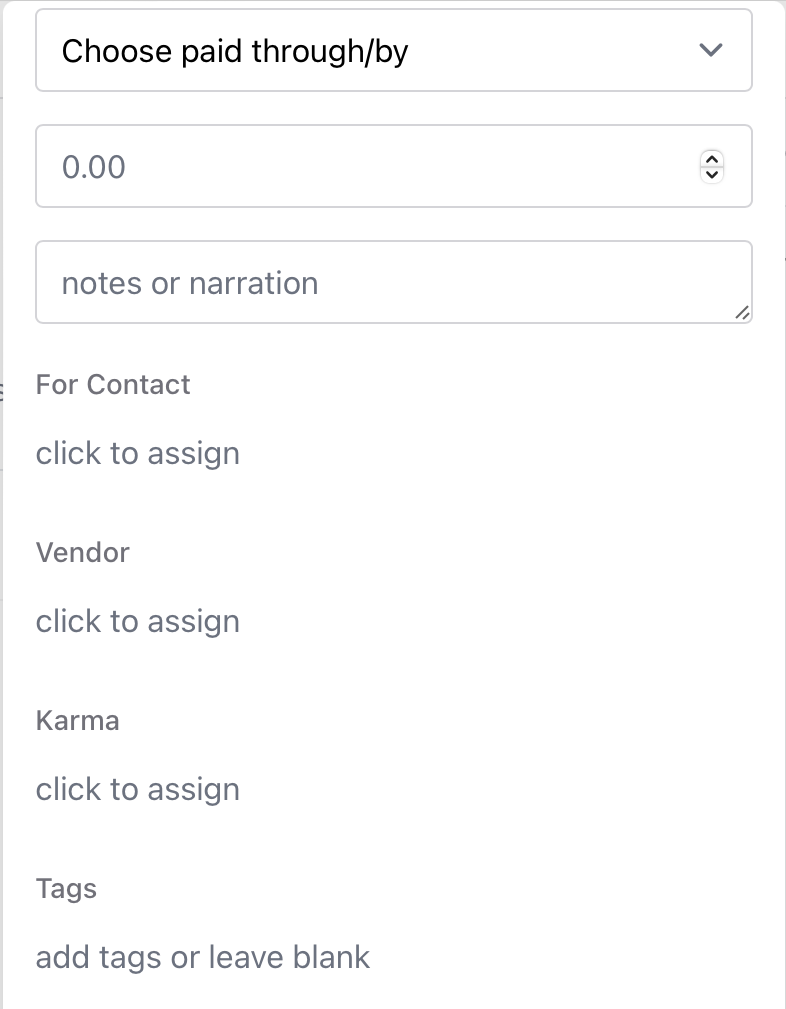
Clicking on More Details during the expense entry process reveals additional fields:
6. For Contact
- Assign the expense to a specific Contact if it was incurred for a particular client or customer. For example, this could be an expense chargeable to the client or one incurred while working for or pursuing the client.
7. Vendor
- Choose the Vendor from whom the expense was incurred. This helps in tracking which suppliers or service providers were involved in the transaction.
8. Karma
- Link the expense to a Karma if applicable. If the task was created from within a Karma, this field will be auto-filled. If not, you can manually associate the expense with a relevant Karma.
9. Tags
- Add Tags to categorize the expense for easier tracking and filtering later. Tags could be used to group similar types of expenses or relate them to specific projects.
10. Receipt Upload
- There is an option to upload a receipt for the expense. You can click the Upload button and attach a scanned image or document of the receipt for proper documentation.
Booking and Splitting Expenses:
11. Booked for / Split Between
- Expenses can be booked for yourself or on behalf of another stakeholder of the task. Additionally, expenses can be split equally between some or all stakeholders. For example, when sharing a cab, you can divide the cost between team members.
- To choose the stakeholders involved, click the plus icon (+) in the "Booked for / Split between" line. This allows you to select who the expense should be assigned to or split between, ensuring better visibility into how much was spent by whom.
Completing the Expense Entry:
Once all the necessary information has been filled out, click Add Expense to save the entry. The expense will now be recorded in the Expenses Tab, and can be reviewed, edited, or deleted as necessary.
Summary:
- Add an Expense: Easily log and track expenses related to the task.
- Categorize Expenses: Use the expense type, paid through, and contact/vendor fields to organize your expenses.
- Attach Receipts: Upload receipts to maintain proper records and transparency.
- Link to Karma: Automatically or manually associate expenses with Karma, providing further context.
By keeping expenses organized within the task, you can manage costs, ensure accountability, and provide detailed records for both internal use and client billing.
User Guide: Activity Tab in Tasks
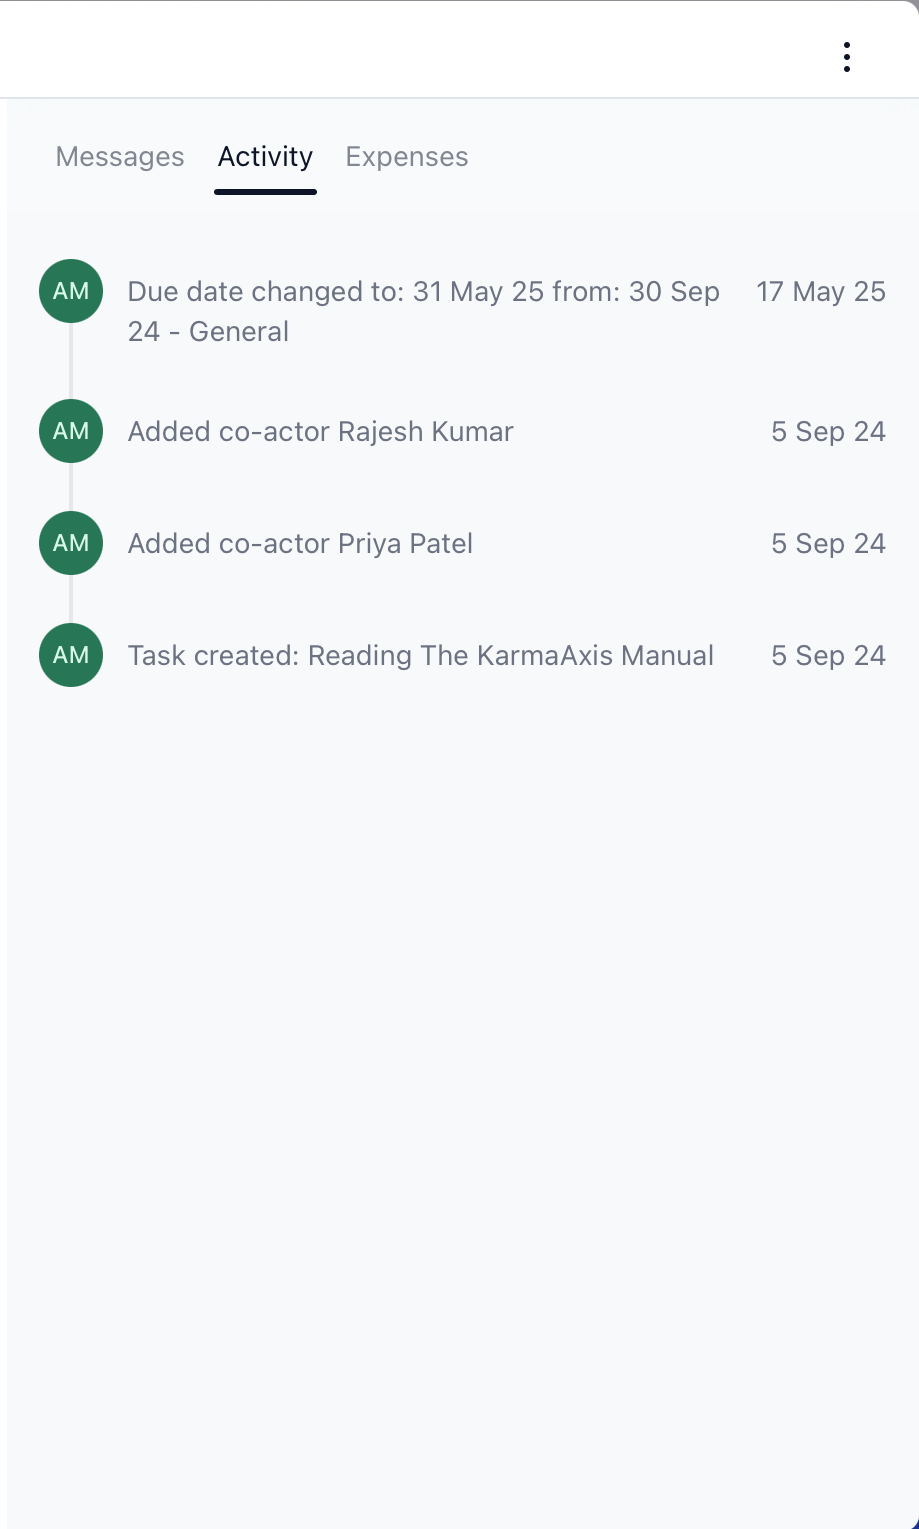
The Activity Tab in KarmaAxis is designed to provide a chronological log of all actions and updates made within a task. This helps track the progress, changes, and contributions made by different team members. Here’s how to use and understand the Activity Tab:
Key Features of the Activity Tab:
1. Timeline of Actions
- The Activity Tab displays a timeline of everything that has been done in the task. Each action is marked by the person who performed it, along with the date.
- For example, actions such as task creation, due date changes, adding co-actors, or creating subtasks are all recorded here.
2. Detailed Entries
- Each entry in the timeline includes:
- Action: Describes what change or addition was made, such as adding a subtask or changing the due date.
- User: Shows the name and profile picture of the person who made the update.
- Date: The date the action was performed is displayed next to the entry.
3. Examples of Recorded Activities
- Task Created: When a new task is created, it will show who created it and when.
- Co-Actor Added: If a co-actor is added to the task, it will reflect the name of the new co-actor and the date they were added.
- Subtasks Added: Subtasks created or edited will be listed here with details about the action.
- Due Date Changes: Any changes to the due date will be logged here, along with the person who made the change.
Benefits of the Activity Tab:
- Transparency: The Activity Tab provides a full record of all changes, making it easy to see who did what and when.
- Accountability: Team members are accountable for their actions within the task, as every update is recorded.
- Progress Tracking: It allows you to monitor how the task is progressing, ensuring that nothing is missed and all important actions are documented.
How to Use It:
- Navigate through the timeline to view all past actions and recent updates.
- Use it to keep everyone on the same page regarding the task’s progress and history.
- As actions accumulate, the Activity Tab serves as a full log of the task’s evolution from start to completion.
This tab is essential for maintaining visibility and ensuring that every change or addition is tracked in real-time, fostering effective task management and teamwork.
User Guide: Three-Dot Menu in Task Pane
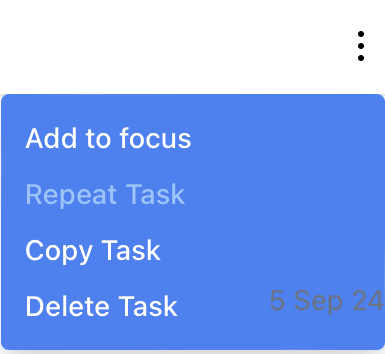
The Three-Dot Menu in the top bar of the task pane offers quick-access tools to manage any task with ease. Whether you want to prioritize a task, reuse it, set up recurring schedules, or remove it, this menu centralizes essential functions in one place.
Here’s a detailed guide on how to use each option available in this menu.
1. Add to Focus
- Purpose: When you select Add to Focus, the task will be moved to a special Focus Mode. This is useful for tasks that require immediate or concentrated attention.
- Focus Mode: Click your profile icon in the top-right navigation bar, then select Focus Mode.
Focus Mode Behaviour: - Only tasks marked as "Focus" will be visible. - All other options and tasks from the main screen will be temporarily hidden, reducing distractions and helping you concentrate on the most important tasks.
- Benefit: Ideal for deep work or urgent tasks where undivided attention is needed.
2. Repeat Task
- Purpose: Enables you to set the task as recurring on a schedule you define.
Repetition Options:
- Once: For scheduled one-time tasks.
- Daily: Repeats every day.
- Weekly: Choose one or more days (e.g., Monday, Wednesday).
- Monthly: Choose one or more specific dates (e.g., 1st, 15th).
- Yearly: Choose one or more months, and select common dates across them.
End Conditions (Optional):Define an end date for the recurrence. OR set a maximum number of occurrences.
Benefit: Great for automating regular follow-ups, reviews, check-ins, and reminders.
3. Copy Task
- Purpose: Selecting Copy Task duplicates the current task, creating an identical copy.
- Use Case: This is especially helpful when you need to replicate tasks for similar assignments or projects without having to re-enter all the details.
- Customization: Once copied, you can edit the duplicated task as needed without affecting the original task.
4. Delete Task
- Purpose: The Delete Task option allows you to permanently remove a task from KarmaAxis.
- Warning: Once deleted, the task and all related information, including subtasks and attachments, will be gone. Use this option carefully to avoid losing important data.
- Use Case: Ideal for tasks that are no longer relevant or were created by mistake.
How to Access the Three-Dot Menu:
- Open any task in KarmaAxis.
- Click the three-dot icon located in the top-right corner of the task pane.
- A dropdown menu will appear with the following options:
- Add to Focus
- Repeat Task
- Copy Task
- Delete Task
Summary:
- Add to Focus: Moves the task to Focus Mode, where only selected tasks are visible for enhanced focus.
- Repeat Task: Automate recurring task schedules across days, weeks, months, or years.
- Copy Task: Duplicates the task, making it easier to reuse task templates or repeat similar assignments.
- Delete Task: Permanently removes the task from KarmaAxis, deleting all associated details and attachments.
This menu provides quick and essential task management features to streamline your workflow and help prioritize your most important tasks.